Quickstart — explore Demo World
Use the bundled Europa pulse power demonstrator to see how OpenEngineering works before designing your own tool. You will inspect a connected requirement, change it on a branch and see the proposed change beside the accepted data.
Before you start
Section titled “Before you start”You need a running instance containing Demo World, with permission to edit objects, create branches and submit proposals. If your team provides that instance, use its sign-in instructions and go to step 2.
The repository provides a local demo. This route requires repository access and a configured development checkout: Node.js 22.17 or later in the 22 series, pnpm 10.26.0, Docker, installed and built workspace packages, a local .env, and both database containers running. A fresh clone needs that development setup first; pnpm dev:demo starts and seeds the demo, rather than installing those prerequisites. This guide does not assume a public hosted sign-up page or a publicly distributed CLI.
1. Open the local demo
Section titled “1. Open the local demo”From the configured repository root:
pnpm dev:demoKeep that terminal running. Wait for Demo ready, then open the URL it prints. The output also names the local sign-in identity, organisation and project.
Choose Continue on the sign-in page, then dev-owner in the local identity chooser. This development-only chooser gives you the permissions needed for the exercise.
2. Find the engineering workspace
Section titled “2. Find the engineering workspace”Select the Demo organisation and Demo world project. Confirm that the branch selector shows main.
Open Requirement from the type navigation rail. The workspace contains a table of requirements, a structure tree and an object detail panel when you select a record. The project and branch selectors identify which engineering data you are viewing.
Open the requirement whose statement begins “The demonstrator shall deliver a peak current”. Its identifier is REQ-001, and its statement requires at least 60 MA at the target load.
Expected result: you can read the requirement’s statement, owner, status and priority in the object detail panel.
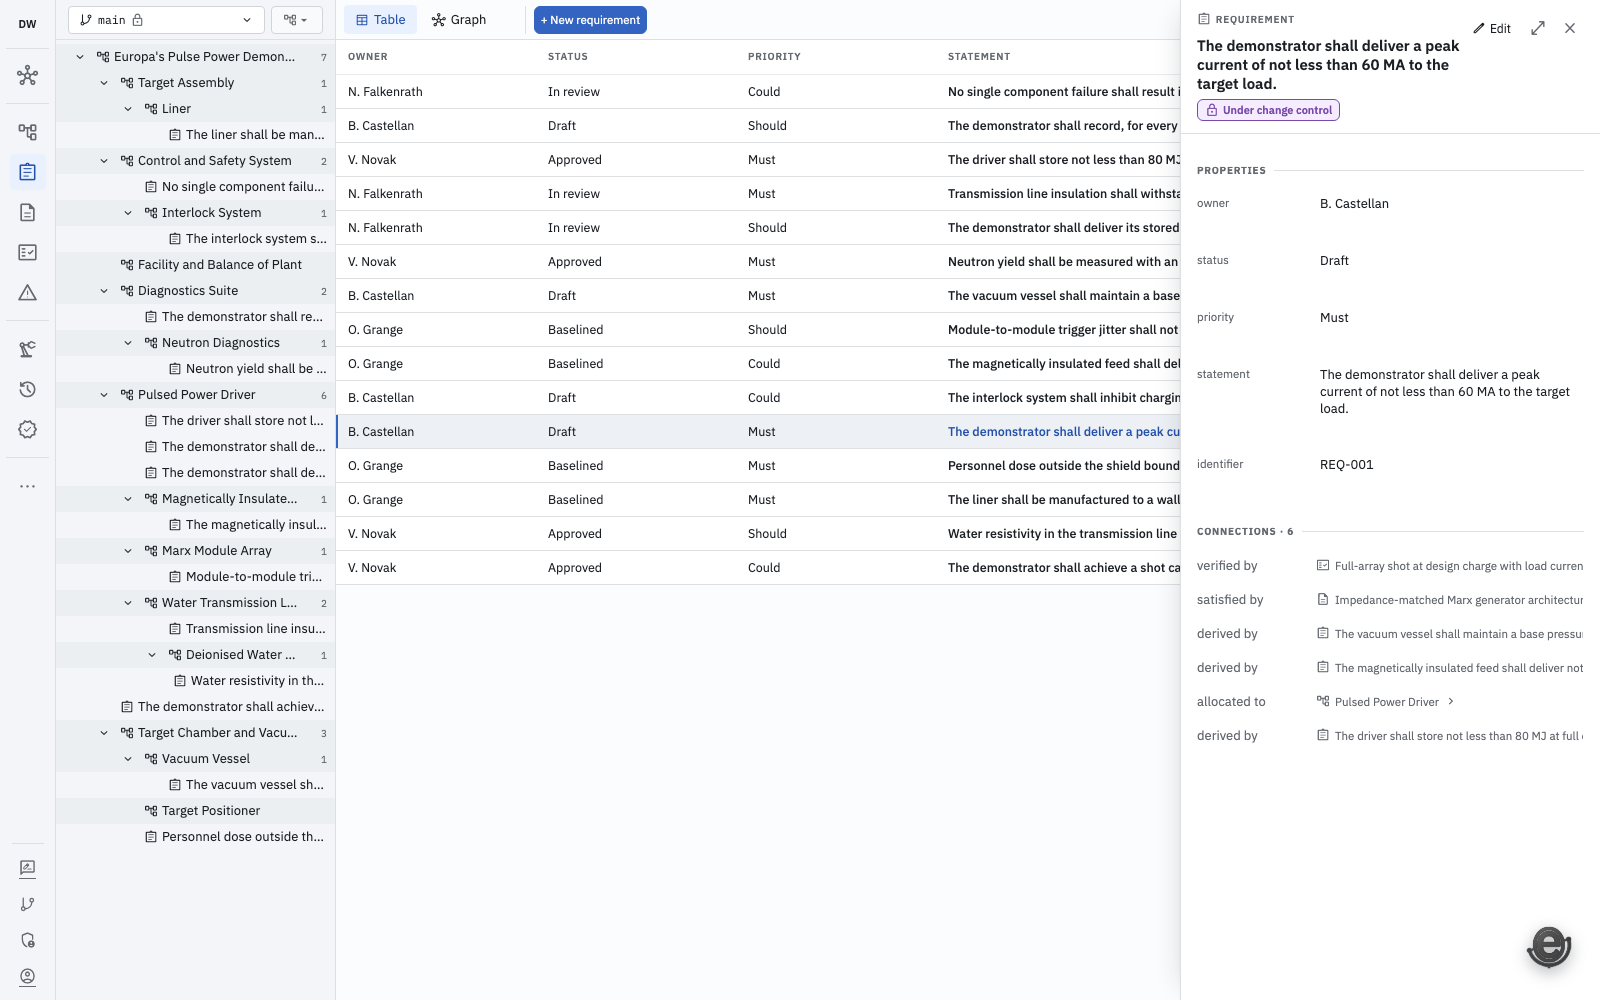
The selected requirement is a record in the table and the same object in the detail panel. Open full-size screenshot.
3. Follow its connections
Section titled “3. Follow its connections”Inspect the requirement’s connections. It is allocated to the Pulsed Power Driver System (identifier PPD), satisfied by SPEC-001, and verified by VER-001. Open a connected object to inspect its own properties.
The Requirement describes what is needed. The Specification describes a design that satisfies it. The Verification describes how it is checked. Each is a separate object connected to the same engineering model.
To explore the other vocabulary, open Part and find Target Positioner Assembly. Its Product structure follows Part → BOM line → Part. A BOM line holds the quantity and find number for a particular usage; a shared fastener remains one Part even when several assemblies use it.
Expected result: you can move from one record to related engineering information without copying that information into another tool.
4. Make a change on a branch
Section titled “4. Make a change on a branch”Return to Requirement and open the branch selector currently labelled main. Choose Create branch, enter a unique name such as quickstart-current-review, and confirm Create branch.
Confirm that the selector now shows your branch. Reopen REQ-001, choose Edit, and change 60 MA to 62 MA in its statement. Choose Save changes.
Switch to main using the branch selector and reopen the requirement. It still says 60 MA. Switch back to your branch; it says 62 MA.
Expected result: the alternative requirement exists on your branch while main retains the accepted version. Other objects and relationships are still available on both branches.
5. Inspect the proposed change
Section titled “5. Inspect the proposed change”Open the branch selector and choose View branches. Find your branch and choose Submit for review. Supply a title and summary if requested, then choose Create proposal and View proposal.
Inspect the proposal diff: it should show the statement changing from 60 MA to 62 MA, with main as the target. Leave the proposal open for this exercise. In real work, an authorized reviewer accepts or refuses the change through the review workflow.
If a control is unavailable or an operation is refused, check the active organisation, project, branch and your permissions with the instance owner. Access to read a project does not automatically grant permission to change it or merge a proposal.
Build your own tool next
Section titled “Build your own tool next”You have now seen the model, its views and a branch-based engineering change. Use Build your engineering tool to plan a workflow, or Bootstrap a tool with an agent to create a model, initial views and demo data in a fresh organisation.
Branching and change control explains the review lifecycle in more detail.