Views and configuration
Views make your model usable. They show the same objects in the layouts people need for their work.
Know which configuration you are changing
Section titled “Know which configuration you are changing”| Configuration | What it controls | Where it lives on an object type |
|---|---|---|
| Object view | The contents of an individual object’s detail panel | presentationBindings.views.object |
| App view | The type’s collection content, such as a table or list | presentationBindings.views.app |
| Title and summary | Which properties identify an object in the interface | presentationBindings.title and summary |
| Structure | The relationships used to build navigation trees and named tree projections | structureDeclaration |
| Rail placement | The type’s navigation group and order | presentationBindings.rail |
A view configuration arranges supported components; it does not grant permissions or create new object types. The graph shows relationships between objects. A structure tree is a chosen projection of those relationships, rather than an object-detail layout.
A minimal requirement view
Section titled “A minimal requirement view”This object view shows a labelled requirement section and its connections. Its owning type must define identifier, statement, status and owner:
{ "root": "body", "elements": { "body": { "type": "ObjectBody", "props": {}, "children": [ "details", "connections" ] }, "details": { "type": "Section", "props": { "heading": "Requirement" }, "children": [ "properties" ] }, "properties": { "type": "PropertyList", "props": { "fields": [ "identifier", "statement", "status", "owner" ] }, "children": [] }, "connections": { "type": "ConnectionList", "props": {}, "children": [] } }}root names the starting element. Each element has a component type, its props, and a list of child element identifiers. ObjectBody is the root for an object view; PropertyList selects and orders fields; ConnectionList shows the object’s connections. Leaf components have an empty children list.
The element identifiers are local to this layout. The field names refer to properties on the type. Misspelled properties, unknown components and invalid trees are refused during validation.
Expected result: opening an object shows its four fields under Requirement, followed by its connections. Editing uses the platform’s existing object editing and save controls.
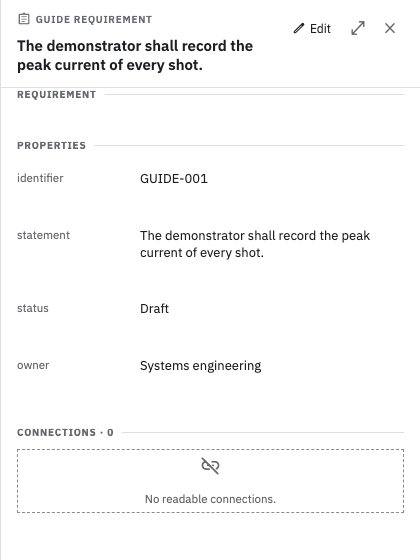
The view above, published and rendered with a live example object. This minimal type has no relationship types yet, so its connections section is empty. Open full-size screenshot.
Put it in a complete type definition
Section titled “Put it in a complete type definition”Download the complete requirement-type.json example. It is a change map suitable for the CLI’s --from argument, keyed by guide-requirement. It includes the property schemas, required fields, title binding, the object view above and an AppBody containing an ObjectTable for the collection view.
Use the example in an organisation where guide-requirement is not already published. It deliberately uses its own type key so it does not replace Demo World’s Requirement. It has no relationship definitions or structure tree; you can add those when your workflow needs them. The connections section can display links once suitable relationship types and objects exist.
After signing in and attaching to that organisation:
oe2 types draft currentoe2 types draft openoe2 types draft revise --change-set <id> --revision <revision> --from requirement-type.jsonoe2 types draft validate --change-set <id> --revision <new-revision>oe2 types draft show --change-set <id> --project <project-id>Inspect the current change set before opening or revising one. An organisation shares one open change set: do not overwrite another person’s draft. Use the identifiers and latest revisions returned by the CLI.
Validation should report no violations. Review the complete diff, then publish the reviewed revision:
oe2 types draft accept --change-set <id> --revision <reviewed-revision>Open More types in the project’s navigation rail and select Guide Requirement. The example has no rail placement, so it is listed there. Create an object with the four required fields on a working branch, then open it to see the configured detail panel. Select App in the type workspace to see the configured collection table; the built-in Table and Graph tabs remain available separately.
Change a view in the application
Section titled “Change a view in the application”- Open Admin, choose Types and select the Change set tab.
- Choose Open a change set if none is open. Find the published type and choose its Edit control.
- Edit the presentation bindings in the type form, preserving the other type definitions. Choose Save type and wait for the updated draft to appear.
- Choose Validate and resolve any reported violations. Inspect the type delta before choosing Accept change set.
- Return to the type’s workspace and inspect the resulting view with representative data.
The ontology agent can help prepare these definitions. Design your ontology and views explains where to open it and how draft approval differs from publication.
Discover supported components
Section titled “Discover supported components”The repository’s shipping definition is packages/schema-language/src/view-catalogue.ts. It lists each component’s allowed view kinds, props and validation constraints. Complete examples live under docs/type-views/examples/; the application implements the corresponding renderers under apps/web/src/components/type-views/.
For a coding agent with checkout access, ask it to read those definitions and validate its output with the current release. With the in-product ontology agent, ask for supported components and validate the resulting change set. A layout copied from another release may need changes.
A new layout continues to use the same objects, permissions and mutation path. Configuration and local validation do not bypass the server’s access checks.